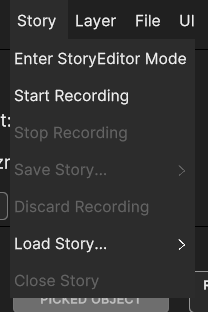
A Story is a “recording” that follows the evolution of the State of a Show over time, and it can be recorded in real-time from the application.
When a Story is recorded, the entire state of the Show is initially captured (like saving a Show file) and subsequently, during recording, any run-time changes to any Show element (Canvases, Layers and Data Sources) is intercepted. These changes will also be recorded, and appended to the timeline of the Story. Stories options are available under the Story Menu.
NOTE that camera parameters (position and orientation) and most navigation parameters are NOT recorded in Stories.
The Story Menu includes commands for recording Stories via the Story Recorder subsystem, for playing back pre-recorded Stories via the Story Playback subsystem and for entering Story Editor mode.
Enter StoryEditor Mode to switch to Story Editor mode (see Chapter 7.2)
Start Recording to Start a new recording
Stop Recording to Stop the current recording
Discard Recording to discard the newly recorded Story data
Save Story to Save the newly recorded Story
Load Story to Load a pre-recorded Story
Close Story to close the currently loaded Story and exit Story Playback mode
Start Recording and Stop Recording options allow to start and stop the recording of a story.
After a story recording is done, user can save it with Save Story or discard it with Discard Recording. Save Story provides two additional options to save it locally or on the backend.
Once recorded and saved, a Story can be loaded back for playback through Load Story menu item, either from a local directory or from the backend (currently disabled). This operation enters the Story Playback Mode and then Story is prepared for the playback with Story Playback functionalities.
Note that during Story Playback, changes to Show elements are not allowed (all Inspector card widgets appear greyed out), as the entire state of the Show is controlled by the Story Playback subsystem.
During story Playback, the Story Playback Panel is shown next to the menu bar at the top center of the screen :
This panel includes buttons for pausing and resuming playback, a slider for seeking the position along the Story timeline, and a label indicating the current position, in seconds from the start. Additionally, buttons to jump between Episodes are provided. See chapter 7.3 for more information about Episodes.
To exit Story Playback mode, click on the Close Story menu item.
The latest release of the DestinE app includes Story Editor subsystem, which features many Story editing functionalities, accessible through the Story Editor Menu.
This menu is only visible when switching in StoryEditor Mode by clicking on Enter StoryEditor Mode, resulting in the “Story” Menu being replaced by the “StoryEditor” Menu.
Many of the options are equivalent to the Story Menu counterpart, and they are the following :
- Exit StoryEditor Mode to switch back to the Story Menu
- Start Recording to start a new recording (equivalent to Story Menu)
- Stop Recording to stop the current recording (equivalent to Story Menu)
- Discard Recording to discard the newly recorded Story data (equivalent to Story Menu)
- Save Story to Save the newly recorded Story (equivalent to Story Menu)
- Load Story to Load a pre-recorded Story (equivalent to Story Menu)
- Clear Story to delete all Tracks in the StoryEditor. Note: this does not delete Show Actors
The core feature of this mode is the Story Editor Panel, which provides a convenient way to edit the content of the Stories. This is covered in detail in the next sub-chapter.
When switching to Story Editor mode, the StoryEditor Panel is initialized and shown at the bottom of the screen. This panel contains many features to edit a Story or create a new Story from scratch.
Upon initialization, Story Editor Panel is immediately setup for editing a new Story involving all the Actors currently present in the Show (Canvases, Layers and Data Sources).
Alternatively, a recorded Story can be loaded via the Load Story option. NOTE that this will clear the Show entirely, and re-populate it with the Actors involved in the loaded Story.
A Story consists of a list of Tracks. Each Track is associated with a single parameter of a specific Actor (for example the “WindStrength” parameter of a Wind Layer). Each Track consists of a list of Control Points (CPs). Each Control Point has a specific position on the Story timeline (a timestamp), and stores a value for the track’s associated parameter.
The Story Editor Panel shows the list of tracks on the left side, and the corresponding control points over the Story Timeline on the right side:
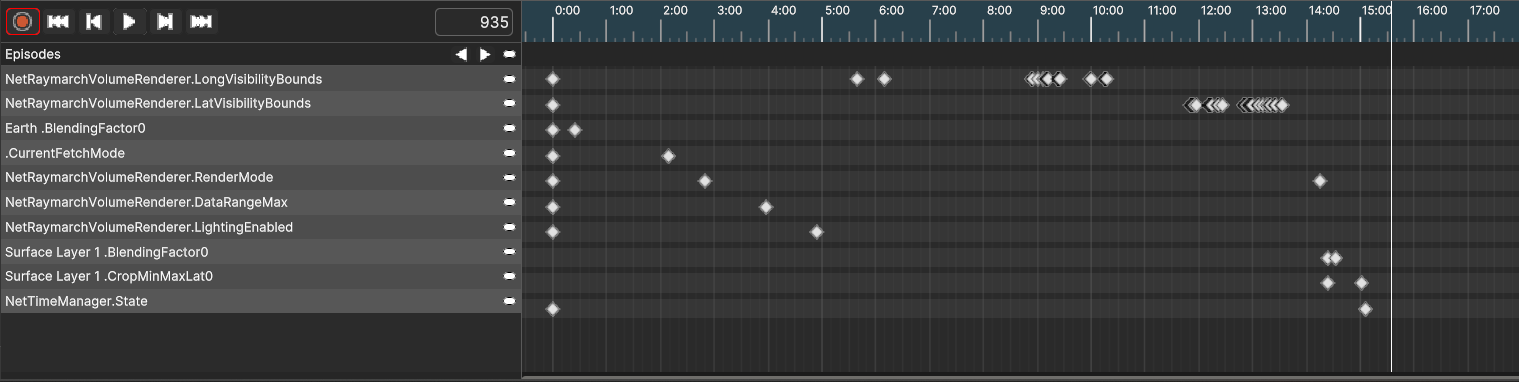
The top bar on the left side includes the following elements:
Record button - Enables and disables recording mode.
Start button - Seeks back to the beginning of the Story.
Previous button - Seeks back from the current position on the timeline to the previous control point, on any track.
Play button - Starts and stops automatic playback.
Next button - Seeks forward from the current position on the timeline to the next control point, on any track.
End button - Seeks to the end of the Story.
Current Position input box - This displays the current position on the Story timeline, in animation-frames. There are 60 animation frames per second. Type into this field to automatically seek to the specified frame.
The right-hand side of the panel displays the timeline, with the timeline-header at the top, and the timeline-grid at the bottom. User can zoom in and zoom out on the timeline with the mouse scroll wheel anywhere over the timeline area, reducing or increasing the time range displayed (horizontal scaling).
The timeline-header displays labels in the format <seconds>:<frame>. For example, “4:30” indicates the 31st frame of the 5th second of the Story Timeline. This corresponds to frame number 270 (as can be seen in the snapshot above). The current seek position can be manually changed on the timeline by clicking on its area or dragging the timeline bar, or by entering the frame number in the input box.
The timeline-grid displays the control points for the individual tracks.
User may wish to horizontally scroll the timeline, clicking and dragging the mouse middle button over the timeline-grid, or using the bottom slider.
Adding control points to a Story requires the story editor to be in recording mode. Once the recording mode is active, any parameter changes to any actor done in the Inspector card (for example, “Wind Speed” on a Wind Layer) will be registered and added as control points in the Story, at the current seek position on the timeline. If the track of that specific actor parameter does not exist yet it will be first created, then the control point will be added at the current seek position.
The Play button playbacks the recorded Story at 1:1 speed (60 animation-frames per second). Recording is supported during playback as well.
The Recorded story can be saved through the Save Story menu item in the device or the backend.
It’s possible to manage control points in the timeline by directly interacting with them. A control point can be selected by clicking on it, and then it can be deleted or moved along the timeline.
Moreover, multiple control points can be selected and managed by selecting an area on the timeline by clicking and dragging the mouse pointer. All the control points inside that area will be selected.
To delete one or more control point right click on its icon or in the selected area, and then click on the Delete pop up option appearing next.
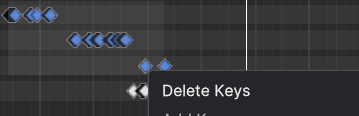
Fig. 8.5 Multiple Keys selection with Delete option pop-up
Adding new Layers or Data Sources to the Show while in Story Editor mode is only supported if “Current Seek Position” is set to 0 (i.e. to the beginning of the timeline). Deleting Layers or Data Sources while in Story Editor mode is not supported.
The last feature implemented for Story Editor mode is Episodes. A story can be subdivided in multiple episodes, which are essentially segments of the story. The commands related to this feature are inside the Episode Bar, below the Main bar of the Editor.
Clicking on the ‘-‘ button shows the Add Episode option to add an episode to the currently seek position. This marks the start of the episode, which appears as a yellow handle in the timeline bar, on the top side above the handles. The adding option can be also displayed by directly clicking on the specific area for episodes in the timeline.
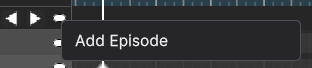
It’s possible to jump from one episode to the previous or the next one with the arrow buttons.
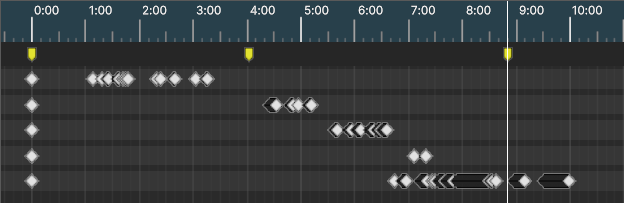
Fig. 8.7 Yellow handles marking the start of Episodes.
Episodes starting points can be moved along the timeline by dragging the corresponding handle. Episodes can be deleted by right clicking on the handles, and clicking on the Delete Episode option.
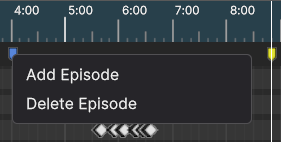
To close the Story Editor Panel and return to regular standalone mode, click on the Exit StoryEditor Mode menu item. This will also remove the Story Editor Menu, and restore the Story Menu.